Before you start doing payroll, you need to understand how Rymnet Payroll works.
What is Payroll Scope & Sequence
A Payroll Scope is pre-defined using branch, division, department and / or section to group employees. It is used to monitor and control payroll processes. By defining payroll scope, it allows the payroll system to identify which Payroll Scope that the paymaster is processing. The latter part, payroll scope is used to produces information to payroll reports accurately.
Payroll Sequence refers payout period, which payments are made to the staff. You are allowed to perform multiple payroll in a month, and it is differentiated using Payroll Sequence.
Negative | 0 | Positive |
Before Month End Payroll | Month End Payroll | After Month End Payroll |
The description of every payment can be defined.
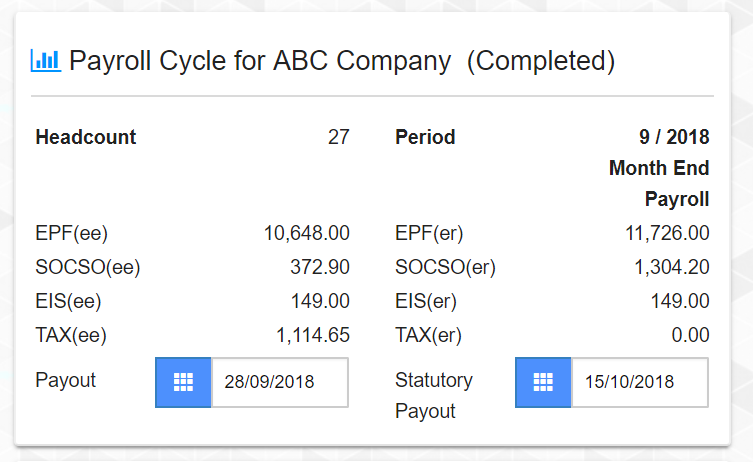
Payroll Status
Payroll Status shows all active Payroll Scope and Sequence Only. You can view all completed payroll by selecting the "Showing" option.

Content | Description |
Scope | Predefined Payroll Scope |
Year | Current Payroll Process Year |
Month | Current Payroll Process Month |
Sequence | Current Payroll Sequence |
Completion Time | Last Payroll Process Date |
Status | Started: Starting of a new payroll. No payroll result yet. Completed: Payroll processed completed. Closed: Payroll is closed (locked). You will still be able to access with read only view. |
Transaction Entry allows users to modify the payroll elements for the selected employees.
Step 1: Go to "Transaction Entry" in the "Payroll" Menu

Content | Description |
Pay Code | All pay element will display in the drop down list. |
Date | Effective date of the pay element. |
Qty | Quantity of the pay element. If the pay element is Overtime, it will be use as OT hours. |
Rate | Rate of the pay element. |
Amount | Amount will auto display. |
Results | Display the payroll net amount after process. |
Step 2: Select "Scope" and employee that you wish to review.
Step 3: You are allowed to new item to paid / deducted from the employee salary.
Step 4: Click "Save" or press "Enter" to save the changes.
Step 4: Once you have saved the changes, please click "Process" to start processing.
Step 5: Payroll Results now will indicates the processed values.
Process Payroll
After you have completed adding the variables, you can start by clicking on "Process" to process payroll for a single employee.
Once the process is done, the net payroll will display on the Results.
If you need to make changes on the fix allowances, you can click on "Fix Transaction" tab.
As for the changes on the employee's statutory contribution, you can click on "Statutory" tab.
Any changes you have made in "Fix Transaction" or "Statutory", make sure to click on "Save" and "Process" to reprocess the payroll.
Payroll Results
| Content | Descriptions |
Earnings | Contains basic salary, bonus, allowances, overtime or any transaction that adds to the employee salary. | |
Deductions | Contains transaction that deducts from employee salary. | |
Statutory | Country regulatory calculation results such as Provident Fund and Tax. | |
Net Pay | Total amount to be transferred to the employee. | |
Employer Total | Total Cost for Employer. |

If you have multiple variables for many employees to key in, you can use the "Payroll Transaction Upload" function. Here is how you can input your variables using the upload function:
Step 1: On the left menu, click on "Payroll".
Step 2: Click on "Payroll Transaction Upload Utility".

Step 3: Click on "Template Download" to download the Transaction Upload Template.
Step 4: Open up the Transaction Upload Template excel file.
Step 5: Fill in the excel template.

Step 6: Once it is done, save your Transaction Upload Template.
Step 7: In Payroll Transaction Upload Utility, click on "Choose File".
Step 8: Find the Transaction Upload Template.
Step 9: Click on "Open".
Step 10: Click on "Upload"
Message will prompt stating how many rows that have been successfully uploaded

If you have made a mistake or errors on the upload files, you can use the "Payroll Transaction upload Rollback" function. Here is how you can rollback your upload files:
Step 1: On the left menu, click on "Payroll".
Step 2: Click on "Payroll Transaction Upload Rollback".

Content | Description |
Date | You can search the period date of your uploaded files. |
ID | Auto generated ID of the uploaded files. |
File Name | Your uploaded filename. |
Uploaded Date | Date of the file that you have uploaded. |
Rollback | Action for you to rollback your uploaded file. |
Step 3: Find your Transaction Upload Template file by using the Date.
Step 4: Click on  to rollback
Step 5: Click on "Confirm".
Once it is done, message will prompt:

Payroll Process is the main system to process your payroll. In Payroll Process, you will be processing for multiple employee in a Scope.
Here is how you do payroll process.
Step 1: On the left menu, click on "Payroll".
Step 2: Click on "Payroll Status".
Step 3: Select the scope to proceed
Step 4: On the payroll status screen, click on "Process".

Content | Description |
Payroll Alert | All alerts are preset and can be added. It helps to verify the payroll results. |
Employee Movement Summary | Summary of employee's activity movement within the organization, such as new joiners, increment, transfer and etc. |
Payroll Summary | Payroll Summary compares the current month and previous month payroll |
Payroll Reports | List of the Monthly Reports. |
Once payroll process is completed, you can verify your payroll results by using the "Payroll Alert" function. The purpose of this function is to check the payroll result, making sure that it is following the labor law condition.
Here is how you can verify your payroll alert:
Step 1: In the process payroll and you have completed processing the payroll, click on "Verify".
Step 2: Payroll Alert will display the results. To look into the payroll alert details , click on

Once the payroll process is completed, you can start to generate the monthly payroll reports.
Here is how you can generate your payroll reports:
Step 1: In Payroll Process, click on "Reports".

There are 2 ways to generate the report:
- Generate single report:
Step 1: Click on 
Step 2: Once the generate report is completed, click on  to download the report.
- Generate all reports:
Step 1: Click on "Generate Reports".
Step 2: Click on "Proceed".
Step 3: Once the generate report is completed, click on "Download All Reports".
If you needed more reports to be shown in "Payroll Process" for every month, you can add the report by using "Payroll Report Settings".
Here is how you can add more monthly payroll reports:
Step 1: On the left menu, click on "Payroll".
Step 2: Click on" Payroll Report Settings".

Content | Description |
Pay Scope | List of Pay Scope to be selected. |
Scope | Display the reports of the scope. |
Report Name | You can name the report as you like. After you type the name of the report, you will need to |
Report No | List of Report to be selected or add. |
Step 3: Choose your "Pay Scope".
Step 4: Click on "Add".
Step 5: Input your report name under "Report Name".
Step 6: Click to select the report.
Step 7: Click on "Save".
Please note that all payslip will be made available to the staff one day after the payout date.
Once you have completed the payroll cycle and wish to proceed to the next cycle, you will need to close the current payroll cycle in order to start the next cycle.
Here is how you close payroll cycle:
Step 1: On the left menu, click on "Payroll".
Step 2: Click on "Payroll Initialization / Closing".

Content | Description |
Please select a payroll scope to continue | List of the Scope to be selected. |
Select an action to proceed | There are three actions:
Closed the payroll cycle and open the next cycle with the same month.
Closed the payroll month and open the next payroll month.
Apply only to the New Payroll Scope. |
Year | Showing the Payroll year. |
Month | Showing the Payroll month. |
Pay Sequence | Showing the payroll cycle. You have the option to choose your payroll cycle. |
Pay Status | Showing the previous payroll cycle status. |
Step 3: Select "Payroll Scope".
Step 4: Choose your "actions".
Step 5: Choose your "Pay Sequence" for the next payroll cycle.
Step 6: Click on "Proceed".
The system will closed your selected payroll and direct you to "Payroll Status" screen. Previous payroll cycle is closed while the next payroll cycle will now show as
"Started".
Before closing, make sure you are certain that your payroll is correct and no further changes are required. Once the payroll is closed, you will no longer be able to make any changes in the last payroll